C++ testing with GTest
Introduction
Unit testing is an essential practice in software development that helps ensure the correctness and reliability of individual units or components of code. In C++, one popular unit testing framework is Google Test, also known as GTest. In this blog post, we will explore how to set up and use GTest for writing unit tests in C++.
Why use GTest?
GTest offers several advantages:
- Comprehensive Assertions: wide range of assertion macros, easily test various conditions, such as equality, inequality, exception throwing, and more.
- Fixture Support: test fixtures, avoid redundant code and ensures a clean testing environment.
- Parameterized Tests: parameterized tests, run the same test logic with different input values.
- Test Discovery: automatically discovers and runs all tests without manual registration.
Getting started with GTest
Installation
Install GTest:
# Download gtest into /usr/src/gtest
sudo apt-get install libgtest-dev
sudo apt-get install cmake

# Build gtest
cd /usr/src/gtest
sudo cmake CMakeLists.txt
sudo make

# Make the lib file accessible from a standard library search path
sudo ln -s /usr/src/gtest/lib/libgtest.a /usr/lib/libgtest.a
sudo ln -s /usr/src/gtest/lib/libgtest_main.a /usr/lib/libgtest_main.a
Simple GTest example
Let’s begin by examining the project structure required to integrate GTest into a C++ project. Here’s an example project structure:
$ tree
.
# ├── build/
├── CMakeLists.txt
├── include/
│   └── mymath/
│       ├── module1.h
│       └── module2.h
# ├── results/
# │   ├── bin/
# │   └── lib/
├── src/
│   ├── CMakeLists.txt
│   ├── main.cpp
│   └── mymath/
│       ├── module1.cpp
│       └── module1.cpp
└── tests/ # THIS IS WHERE WE WRITE OUR TESTS
│   ├── CMakeLists.txt
│   └── main.cpp
└── thirty_party/
// include/mymath/module1.h
#ifndef MODULE1_H
#define MODULE1_H

class Arithmetic {
public:
    int add(int a, int b);
    int multiply(int a, int b);
};

#endif
// src/mymath/module1.cpp
#include "module1.h"

int Arithmetic::add(int a, int b) {
    return a + b;
}

int Arithmetic::multiply(int a, int b) {
    return a * b * b; // TRY DOING STH WRONG HERE //
}
// include/mymath/module2.h
#ifndef MODULE2_H
#define MODULE2_H

// Function to calculate the factorial
unsigned long long factorial(unsigned int n);

#endif
// src/mymath/module2.cpp
#include "module2.h"

unsigned long long factorial(unsigned int n) {
    if (n == 0 || n == 1)
        return 1;
    else
        return n * factorial(n - 1);
}
Setting up GTest with CMake
Before we dive into writing unit tests, we need to set up GTest with our C++ project using CMake. Below is a CMakeLists.txt and tests/CMakeLists.txt files that configures the GTest framework and builds our test executable.
# CMakeLists.txt
cmake_minimum_required(VERSION 3.5)
project(project)

# Set flag C++ 11
set(CMAKE_CXX_STANDARD 11)

# Set outputs into a specific dir, e.g. 'bin'
set(CMAKE_RUNTIME_OUTPUT_DIRECTORY ${PROJECT_SOURCE_DIR}/results/bin)

add_subdirectory(src)

add_subdirectory(tests) # THIS IS WHERE WE BUILD OUR TESTS
# tests/CMakeLists.txt
# Import GTest
find_package(GTest REQUIRED)
if(GTest_FOUND)
    message(STATUS "GTest found: ${GTest_VERSION}")
else()
    message(FATAL_ERROR "GTest not found")
endif()

if(GTEST_LIBRARY)
    message(STATUS "GTEST_LIBRARY:" ${GTEST_LIBRARY})
    message(STATUS "GTEST_MAIN_LIBRARY: " ${GTEST_MAIN_LIBRARY})
else()
    set(GTEST_LIBRARY "/usr/lib/libgtest.a")
    set(GTEST_MAIN_LIBRARY "/usr/lib/libgtest_main.a")
endif()

# Collect .cpp test cases in tests and .cpp definition in srxc/mymath/
file(GLOB_RECURSE SOURCES "./*.cpp"
                            "../src/mymath/*.cpp"
                            )
message(STATUS "SOURCES in tests is:" ${SOURCES})

# Add the executable "project_test"
add_executable(project_test ${SOURCES}) # include definition codes

# The target_link_libraries directive needs to be part of the same CMakeLists.txt as the add_executable directive.
target_link_libraries(project_test ${GTEST_LIBRARY} ${GTEST_MAIN_LIBRARY} pthread)
# given header files
target_include_directories(project_test # target project_test from add_subdirectory(tests)
                            PRIVATE
                                ${PROJECT_SOURCE_DIR}/include/mymath
                                )
Writing unit tests
In order to create unit tests using GTest, we create a tests/main.cpp file. This process involves explicitly registering test cases and test suites, typically achieved through the use of macros. In GTest, a test suite (TestSuite) is a collection of related test cases (TestCase), while a test case is an individual test scenario or unit of testing within a test suite. Below is an illustration of the tests/main.cpp file as an example:
Test Fixture
We start by creating a test fixture, which allows us to set up common objects and data used by multiple test cases. In this example, we’ll create a fixture for the Arithmetic class.
// tests/main.cpp
#include <gtest/gtest.h>
#include "module1.h"
#include "module2.h"

// Define a test fixture for the Arithmetic class
class ArithmeticTest : public ::testing::Test {
protected:
    // Create an instance of the Arithmetic class
    Arithmetic result;
};
Test Cases
Next, we write test cases within the test fixture to verify the functionality of the Arithmetic class methods.
- TEST_F macro is used to define a test case within a test fixture.
- TEST macro is used to define a standalone test case without a test fixture.
// Test case for the add method
TEST_F(ArithmeticTest, AddTest) {
    ASSERT_EQ(result.add(2, 3), 5);
}

// Test case for the multiply method
TEST_F(ArithmeticTest, MultiplyTest) {
    ASSERT_EQ(result.multiply(2, 3), 6);
    ASSERT_EQ(result.multiply(2, 0), 0);
    ASSERT_EQ(result.multiply(3, 10), 30);
}

// Standalone test case for the factorial function from module2.h
TEST(Module2TestSuite, FactorialTest){
    ASSERT_EQ(factorial(4), 24);
    ASSERT_EQ(factorial(0), 1);
}
Building and running tests
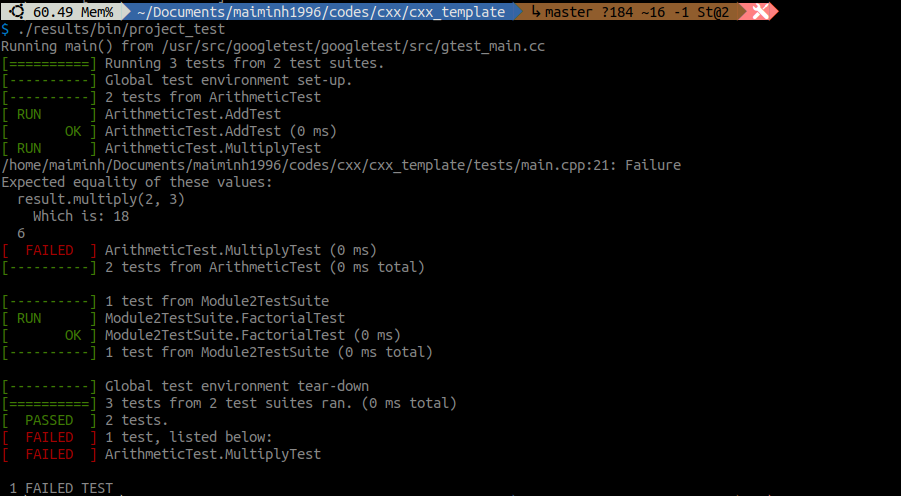
After writing the test cases, we build and run the tests as follows:
mkdir build
cd build
cmake ..
make
cd .. && ./results/bin/project_test

To address this, we make modifications to src/module1.cpp
// src/mymath/module1.cpp
#include "module1.h"

int Arithmetic::add(int a, int b) {
    return a + b;
}

int Arithmetic::multiply(int a, int b) {
    return a * b; // FIX IS HERE //
}
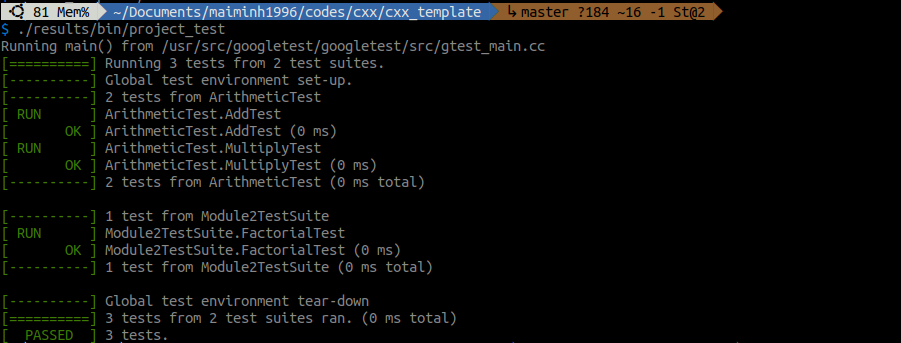
Build and run the tests again:
cd build && make
cd .. && ./results/bin/project_test

All tests pass, it indicates that the functionality of the Arithmetic class and the factorial function (from module2.h) are working correctly.
Writing effective tests with GTest
To write effective tests using GTest, consider the following best practices:
- Test Naming: use descriptive and meaningful names for your test functions to clearly indicate the purpose of each test.
- Test Independence: ensure that each test is independent and does not rely on the state or outcome of other tests.
- Fixture Usage: use fixtures to set up common resources or test contexts, and tear them down after the test is complete.
- Assertions: use appropriate assertion macros for different test conditions to ensure your tests cover various scenarios.
Check out Advanced GoogleTest Topics or GTest Testing Reference to see more about advanced Features of GTest such as typed tests, death tests, test event listeners, etc.
Conclusion
Unit testing is crucial for ensuring the quality and correctness of software projects. Google Test (GTest) provides a powerful framework for writing unit tests in C++. In this blog post, we explored the setup process of GTest in a C++ project and wrote a simple unit test to verify the functionality of a basic function. By adopting unit testing practices with GTest, developers can increase code coverage and build more robust and reliable software.
References
- GoogleTest User’s Guide: google.github.io/googletest
Enjoy Reading This Article?
Here are some more articles you might like to read next: