Why docker?
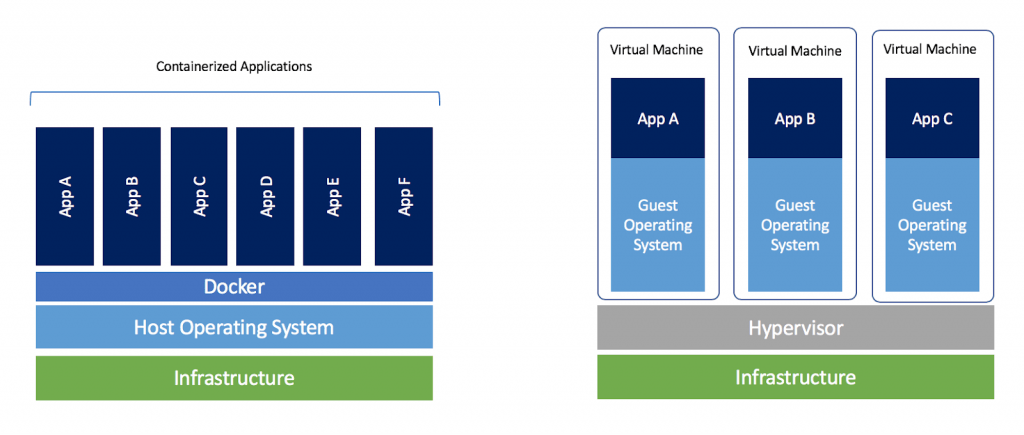
Docker is a useful tool which allows us to run the code in a contained environment that is isolated from the rest of the system. This can be particularly useful when working with deep learning frameworks, which can be difficult to install and configure. By using Docker, we can easily switch between different versions of a deep learning framework, or between different libraries or packages, or between different OS version, without affecting the rest of the system. Additionally, Docker can be used to package up ythe code and dependencies into a single container, which can be easily shared with others or deployed to a cloud environment. In short, Docker is a containerization solution that lets us “build, run and share applications with containers”.
- Multiple CUDA versions: virtualenv –> docker containers
- Different OSs: launch a Docker container with Ubuntu 20.04 while the host machine is running Ubuntu 16.04 and vice versa.
- Easily deploy the container to cloud providers (such as AWS, Google Cloud, Azure etc.).
Quick example
Context
We want to run PointRCNN by using docker. By default, the author proposes this requirement:
- Ubuntu 16.04 (gcc 5.4.0)
- python 3.6+
- pytorch 1.0
As expected we will build a docker image like mine mnaminh1996/pointrcnn. From there, we can launch the docker container to run PointRCNN on. The steps that we need to do are as follows:
Host machine (my machine) description:
cat /etc/os-release: Ubuntu 18.04nvcc -V: CUDA 11.0 (FYI: nvcc is CUDA compiler driver included in CUDA toolkit)cd /usr/local/cuda/samples/1_Utilities/deviceQuery && sudo make && ./deviceQuery | grep Capability: GeForce RTX 2070 (capability 7.5 - Turing) –> supported by CUDA 10.2 (FYI: we refer the NVIDIA CUDA Toolkit documentation to determine which GPU architectures (compute capacity) are supported by a specific version of CUDA).ubuntu-drivers deviceslscpu,lshw,lsblk
Build docker image
Build docker image on host machine
We set up for PointRCNN, dataset, etc following https://github.com/sshaoshuai/PointRCNN.git.
1
git clone --recursive https://github.com/sshaoshuai/PointRCNN.git
Download KITTI dataset and put it somewhere like this:
1
2
3
4
5
6
7
8
9
$ tree
data
├── KITTI
│   ├── ImageSets
│   ├── object
│   │   ├──training
│   │      ├──calib & velodyne & label_2 & image_2 & (optional: planes)
│   │   ├──testing
│   │      ├──calib & velodyne & image_2
Download the pretrained weight proposed by PointRCNN author.
1
2
3
4
5
6
7
8
9
10
11
12
13
14
15
cd PointRCNN
echo "tqdm
fire
scikit-image
numba
easydict
numpy
scipy
scikit-learn
PyYAML==5.1.2
h5py
tensorboardX
torch==1.0.1
setuptools
protobuf" > requirements.txt
We then create a Dockerfile based on this docker image nvidia/cuda:10.2-cudnn8-devel-ubuntu16.04. But first we need to install Docker + NVIDIA Container Toolkit on the host machine, refer Pre-requirement.
1
2
3
4
5
6
7
8
9
10
11
12
13
14
15
16
17
18
19
20
21
22
23
24
25
26
27
28
29
30
31
32
33
34
35
36
37
38
39
40
41
42
43
44
45
46
47
48
49
50
51
52
53
54
55
56
57
58
59
60
FROM nvidia/cuda:10.2-cudnn8-devel-ubuntu16.04

ENV TZ=Europe/Minsk
RUN ln -snf /usr/share/zoneinfo/$TZ /etc/localtime && echo $TZ > /etc/timezone

# Install basic dependencies
RUN apt-get update && apt-get install -y --no-install-recommends \
    apt-utils \
    build-essential \
    cmake \
    git \
    wget \
    libatlas-base-dev \
    libboost-all-dev \
    libgflags-dev \
    libgoogle-glog-dev \
    libhdf5-serial-dev \
    libleveldb-dev \
    liblmdb-dev \
    libopencv-dev \
    libprotobuf-dev \
    libsnappy-dev \
    protobuf-compiler \
    python3-dev \
    python3-pip \
    python3-setuptools \
    python3-tk \
    python3-wheel

RUN apt-get install -y --no-install-recommends \
    libssl-dev libncurses5-dev libsqlite3-dev \
    libreadline-dev libtk8.6 libgdm-dev \
    libdb4o-cil-dev libpcap-dev

# on ubuntu16.04, python3.5 is default
# RUN apt-get update && \
#     apt-get install -y software-properties-common && \
#     add-apt-repository ppa:deadsnakes/ppa
# RUN apt-get update && apt-get install -y python3.6
RUN apt-get update && \
    apt-get install -y build-essential && \
    wget https://www.python.org/ftp/python/3.6.10/Python-3.6.10.tgz && \
    tar xzf Python-3.6.10.tgz && \
    cd Python-3.6.10 && \
    ./configure && \
    make && \
    make install

RUN rm /usr/bin/python
RUN ln -s /usr/local/bin/python3 /usr/bin/python

WORKDIR /home

# Install Python dependencies
COPY requirements.txt .

RUN apt-get update && apt-get install --reinstall ca-certificates
RUN python3 -m pip install --upgrade pip setuptools wheel
RUN python3 -m pip install --no-cache-dir opencv-python
RUN python3 -m pip install -r requirements.txt
Build docker image:
1
docker build -t <name-build-image:name-tag> .
Check if docker image built successfully:
1
2
3
docker images
# REPOSITORY  TAG     IMAGE ID      CREATED       SIZE
# pointrcnn   latest  dde823c6de1d  23 hthes ago  8.21GB
Run a container on host machine with --gpus all to enable gpus into container. We can blind-mount datas -v /path-to-data-in-host/:/path-to-data-in-container/ to use in container:
1
2
3
4
5
6
7
8
9
10
11
12
13
14
15
# Run a docker container in interactive mode based on the docker image above
# and blind-mount code, dataset, weight, etc
docker run --gpus all -v /home/maiminh/PointRCNN/:/home/PointRCNN/ \
  -v /home/maiminh/KITTI_data/:/home/PointRCNN/data/ \
  -v /home/maiminh/PointRCNN.pth:/home/PointRCNN/PointRCNN.pth \
  -it pointrcnn

# Install pakages and run an example following
# https://github.com/sshaoshuai/PointRCNN
cd PointRCNN
sh build_and_install.sh
cd tools
python eval_rcnn.py --cfg_file cfgs/default.yaml \
  --ckpt ../PointRCNN.pth --batch_size 1 \
  --eval_mode rcnn --set RPN.LOC_XZ_FINE False
Share docker image
Create a account on docker hub and share the above built docker image:
1
2
3
4
5
# Login with Docker ID (from docker hub)
docker login
# push the image into Docker Hub.
docker tag pointrcnn mnaminh1996/pointrcnn:latest
docker push mnaminh1996/pointrcnn:latest
Run docker container
Run docker container on the target machine
Pull docker image and run a docker container on the target machine. Similarly, we have to install Docker + NVIDIA Container Toolkit on the target machine, refer Pre-requirement.
1
2
3
4
5
6
7
8
9
10
11
12
13
14
15
16
17
# Pull the docker image from docker hub
docker pull mnaminh1996/pointrcnn:latest
# Run a docker container in interactive mode based on the docker image above
# and blind-mount code, dataset, weight, etc
docker run --gpus all -v /home/maiminh1996/PointRCNN/:/home/PointRCNN/ \
  -v /home/KITTI/data/:/home/PointRCNN/data/ \
  -v /home/maiminh1996/PointRCNN/PointRCNN.pth:/home/PointRCNN/PointRCNN.pth \
  -it mnaminh1996/pointrcnn:latest

# Install pakages and run an example following
# https://github.com/sshaoshuai/PointRCNN
cd PointRCNN
sh build_and_install.sh
cd tools
python eval_rcnn.py --cfg_file cfgs/default.yaml \
  --ckpt ../PointRCNN.pth --batch_size 1 \
  --eval_mode rcnn --set RPN.LOC_XZ_FINE False
Pre-requirement
Docker
Install Docker on the host machine and also on the target machine if it is not already installed https://docs.docker.com/engine/install/.
1
2
3
4
5
6
7
8
9
10
11
12
13
14
15
# Update the package index and install the required packages
sudo apt-get update && \
  sudo apt-get install apt-transport-https ca-certificates \
  curl gnupg-agent software-properties-common
# Add the GPG key for the Docker repository
curl -fsSL https://download.docker.com/linux/ubuntu/gpg | \
  sudo apt-key add -
# Add the Docker repository to ythe system's software stheces
sudo add-apt-repository \
  "deb [arch=amd64] https://download.docker.com/linux/ubuntu $(lsb_release -cs) stable"
# Update the package manager's package list and install docker
sudo apt-get update && \
  sudo apt-get install docker-ce docker-ce-cli containerd.io
# Verify that Docker is installed correctly by running the following command
sudo docker run hello-world
NVIDIA Container Toolkit
Install the NVIDIA Container Toolkit on the host machine https://github.com/NVIDIA/nvidia-docker. This will allow you to run GPU-accelerated Docker containers.
1
2
3
4
5
6
7
8
9
10
11
12
# Add the GPG key for the NVIDIA Container Toolkit package repository
curl -s -L https://nvidia.github.io/nvidia-docker/gpgkey | \
  sudo apt-key add -
# Add the package repository to ythe list of stheces
distribution=$(. /etc/os-release;echo $ID$VERSION_ID)
curl -s -L https://nvidia.github.io/nvidia-docker/$distribution/nvidia-docker.list | \
  sudo tee /etc/apt/stheces.list.d/nvidia-docker.list
# Install the `nvidia-docker2` package
sudo apt-get update && \
  sudo apt-get install -y nvidia-docker2
# Restart the Docker daemon
sudo pkill -SIGHUP dockerd
Dockerfile
Some keywords: FROM, ENV, RUN, WORKDIR, COPY, CMD. For the complet list, refer to https://docs.docker.com/engine/reference/builder/.
Pre-designed images:
- https://hub.docker.com/
- https://registry.hub.docker.com/r/nvidia/cuda/tags
- https://hub.docker.com/r/pytorch/pytorch/tags?page=1
Docker image
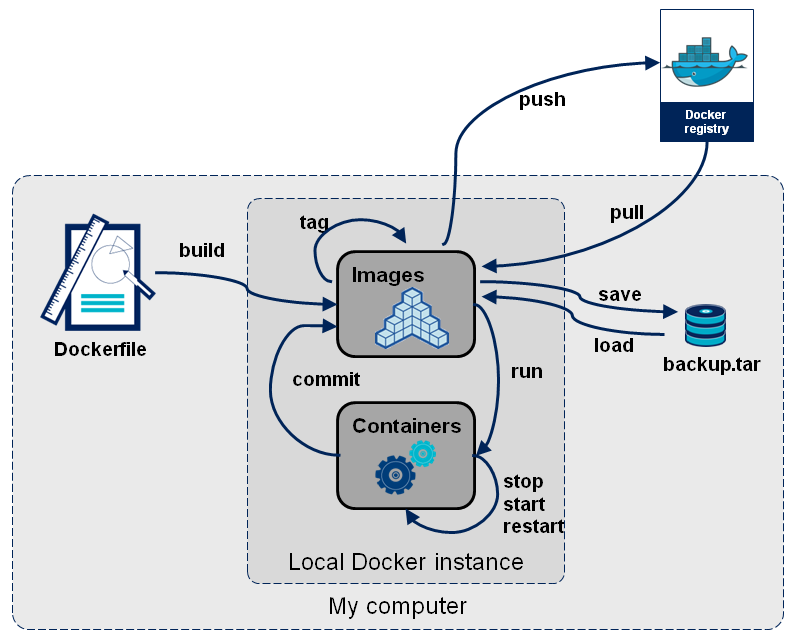
docker image contains set of cmd and metadata. If Docker image was like a class, docker container is an instance
Build a docker image
1
docker build -t <name-build-image> . # . where it contains Dockerfile
List, tag remove images
1
2
3
4
5
6
7
8
9
10
11
12
13
14
# Show images
docker images # list all images
# docker image ls

# show the history of an image
docker history <image-id>

# set image name from image-id
docker tag <image-id> <image-names>

# remove docker image
# may need to resolve conflict with dependency container
docker rmi <image-id>
# docker image rm <image-id>
Docker container
each container is an instance of un image.
Run a container (it actually creates a new container based on the specified image). We can use VS Code –> Activity bar –> Docker to modify code, manage docker images/ container/ …
1
2
3
4
5
6
7
8
9
10
# show all images
docker images

# create a new container
# run a container in interactive mode (-it), built-image: image id/ name
docker run -it <built-image>

# list all containers
docker ps # all running containers
# docker ps -a # all containers (including stopped)
Stop, restart a container
1
2
3
4
5
6
7
# stop
docker stop <container-id>
# docker rm <container-id>

# restart an existing container after it exited and the changes are still there.
docker start <container-id> # restart it in the background
docker attach <container-id> # reattach the terminal & stdin
Commit a container (intead of working on old container, we can save container changes into new image).
1
docker commit <container-id> <new-image-name>
Copy datas from container
1
2
# copy data from a container to local machine
docker cp <container-id>:app/epoch50.pth /path/
blind-mount data
1
2
3
# dataset stored in the /data directory on ythe host machine,
# and you want to mount this directory into a Docker container at /app/data.
docker run -v /data:/app/data -it <image_name>
Save docker image
Save in file .tar
Save the docker image in .tar:
1
docker save -o <built-image.tar> <built-image>
Or export a docker container in .tar:
1
docker export <container-id> > <container-name.tar>
Push on docker hub
1
2
3
docker login
docker tag <local-image:tagname> <new-repo:tagname>
docker push <new-repo:tagname>
References
- https://maiminh1996.github.io/distilled/cuda/installing-cuda.html#multi-cuda-version-on-the-one-machine
- https://hub.docker.com/r/mnaminh1996/pointrcnn
- https://registry.hub.docker.com/layers/nvidia/cuda/10.2-cudnn8-devel-ubuntu16.04/images/sha256-f32cdb7cfbd4fb047fe6580333ffd20204fdedc28742fa044885651d5af190f6?context=explore
- https://github.com/sshaoshuai/PointRCNN.git
- https://docs.docker.com/engine/install/
- https://github.com/NVIDIA/nvidia-docker
- https://docs.docker.com/engine/reference/builder/
- https://hub.docker.com/
- https://registry.hub.docker.com/r/nvidia/cuda/tags
- https://hub.docker.com/r/pytorch/pytorch/tags?page=1